Monday, August 29, 2011

New York, New York!

Bonsoir,

Can you think about New York city without hearing the Frank Sinatra song? I definitely cannot! I'm lucky enough that my husband is going to work for a day in New York AND he is bringing me along AND my mom will keep the kids AND the mega storm Irene can't cancel this on me anymore! The stars must be aligned or something!
Frank Sinatra

Strangely, I've been to New York numerous times already and I've never visited the fashion district... But if you ever have the chance to go touch some 4ply silk there, here is the absolute best guided tour you could find on the web: Meg's Shop the Garment District.

Click on the link entitled "View NY Garment District Stores on a large map" for the best printable map of the district with Meg's commentary and all the shops picture, address, schedule, description, etc! Even bathroom stops, restaurants and places to leave your significant other wander while you shop! Positively Awesome! Thank you Meg!

Friday, August 26, 2011

Monique Dress - Tired of Muslin!

Bonne nuit!

I worked some more on my Monique dress. The problem I had was that when the dress is pined on me and I cross my arms in front, it's pulling fiercely in the back.
  • I tried adding width at the center back seam. I sew a strip of fabric with evenly spaced row of stitches so my husband would be able to pin following the same distance from top to bottom. I figured the center back (CB) seam need to stay on grain. But it didn't work: armholes and back neckline where gaping and wrinkling at the top even when my arms where at my sides...
Gaping back neckline
  • I removes fabric from the front of the armholes (leaving the side seam intact) and redrew the curve, sans French curve ruler... (Note to self, buy one!) ; it has improved matter significantly.
  • Then, I measured my real apex and moved the waist dart accordingly.
back view, with redrawn armholes
  • I redrew my pattern piece on a new piece of paper for readability!! It was starting to be quite chaotic...
chaotic front bodice pattern piece

last front bodice pattern piece
I  tried to use Diane as my stunt double but I think she is not enough like me to do the final fitting and tweaking... She is awesome for general length, width and hemming though! She will need to be properly padded to be closer to my figure...

Then I cut the dress's bodice and waistband pieces in my fashion fabric (hey hey! I used the same fabric as my muslin, my inexpensive 3$/m super raspberry mystery fabric!) But I have some bad puckers on my darts end...

All 4 darts have protruding points

Even worst from the side or the top!

I tried to shorten the side dart, but it was not a good idea ; it created excess fabric on the side of my bust. Here are my limited ideas to remedy to my boxy puckered dress bodice:
  • I was thinking that my problem might be my poor pressing skills ; I tried using a rolled towel to support my darts. (Note to self, buy a tailor ham!) That looked better but didn't remove the puckers.
  • I could try to angled the side dart to create a dart that goes up on my bust (french dart, is it?) or a curved dart - I thought that the puckers might be due to the proximity of the 2 darts points or their big sizes?!? The curved or French darts are supposed to be better looking on busty damsel. But I'm not quite sure how to do it...
  • Or I could try to divide my big side dart into multiple darts ; darts cluster. Or remove some width from the side dart and put it in the waist dart, then divide the waist dart into 2 to 3 smaller ones... But I'm not sure it will solve my problem if my poor pressing or drafting skills are to blame!?!
  • I found information on how to move my side dart into an armscye dart and slash through it all to create a smooth princess seam. I'm tempted by this one - that would remove my square darts tips problem. But it will modify the simple design and look of the dress, no?
What should I do?
Any ideas why I failed with my quadruple nipples-darts bodice?

Thursday, August 25, 2011

Montréal Fabrics Scene!

Bon après-midi,

I've became quite obsessed with 4 ply silk lately... I've seen projects by fellow bloggers (Sunni's Seafoam Silk Ginger skirt and Gertie's Homage to Elizabeth slip and Pink Sencha blouse in particular) and the description of this fabric make me wanna roll myself in yards of it!

4 ply silk

This is considered the "Cadillac" of silks. It is "heavy" for silk, has a beautiful luster to it even in pastel colors and drapes beautifully. It hangs like glass when you are standing still and it resists wrinkling in a very real way. This silk is generally used for very fine business suits, formal evening wear, bridal gowns and simply constructed dresses that you can wear during the day and by adding embellishments carry into an evening situation. The quality of this silk varies from supplier to supplier. Because it is a crepe it has a stretch to it and if you don't get a good quality, you will have a lot of stretching that is difficult to control while sewing. It makes up into beautiful bias cut gowns in the wider width. Source: Anjoorian Silks

Hence started my quest of fine fabrics stores in my hometown Montréal, Québec, Canada! But I haven't found 4 ply silk yet... Meanwhile, I would like to share with all Montréalers and visitors fabricaholics alike my findings.
  • Fabricville: This is the biggest fabric stores chain I know, Its probably the equivalent of the American's Jo-Ann. You can find a lot of these around town, I usually go to the one in Lasalle near my place. But when I was younger I used to go to the one in Place Versailles... They usually do not offer a lot of specialized notions nor fine fabrics like silks...
  • Tissus Hajaly - 3332 Ontario E., 8100 St-Denis, 2810 Masson: A small chain of stores. IThe one on Ontario Street is where my mother and grand-mother used to buy their sewing supplies when I was young...
  • Emeline and Annabelle: I found a crafting and sewing café on the web that is supposed to be in Notre-Dame de Grâce (NDG) ; it's not too far from my place and I'm going to check it out soon...
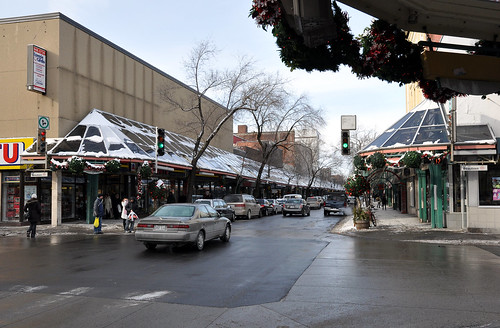
Note that in Montréal, we have our own "Garment Districts" and it is paired with the wedding gowns shops on St-Hubert Street. La plaza St-Hubert is a covered promenade with shops and restaurants between Beaubien and Jean-Talon. Note that most fabrics stores are north of Jean-Talon Street and not part of the Plaza.

La rue St-Hubert, Montréal

Fabrics Shops on St-Hubert:
  • Effiloché - 6260 St-Hubert: They have the cutest designer's quilting cotton by the meter or fat quarters and lots of knitting supply. They also offer classes and you can pay per hour to sew with their serger and equipment.
  • Tissus Regent - 6580 St-Hubert: It is my bargain place for all sort of mixed up fabrics rolls (2, 3 or 4$/m) and they have a lot of fabrics for dance/skating costume in Lycra... But you need some patience to go through the place!
  • Fine Fabrics Shop: I found a gem of a store with all sort of silk (velour, chiffon, etc) and wools at 7195 St-Hubert, north of Jean-Talon, on the east side. A good plus for me, everything is well organized and labelled - a rare thing on St-Hubert Street! As soon as I'm more confident with my fitting skills, I'm going to treat myself there!
  • Notions Shop: There is a notions shop on St-Hubert, on the West side of the street just north of Jean-Talon ; They sell laces, ribbons, trims, belts notions, feathers, etc.
That's it for now! If you have been fabrics shopping in Montréal, where did you went? Do you ever go fabrics hunting while in vacation abroad?

P.S.: I will update this entry next time I will set foot on St-Hubert, with the names and addresses of the shops...

Tuesday, August 9, 2011

Mini me

Bonsoir!

I'm a birthday girl today and I must have been really REALLY nice this year! Guess what was in the box my mom wrapped in an old sewing pattern and topped with a bow made from slices of the instructions!?!

...a Mini Me!!
Mini Me - prettier than the one in Austin Powers!


Can't wait to use my new dress form! Merci Suzy, Yvan, Mélanie et Danny! xxx

It will be replacing my unused and already WAY too huge duck tape dress form I made a few months ago. It's a really bad idea to made a duck tape dress form when you are still nursing and loosing pregnancy weight so fast! Other than that, it was fun and fast to make, but needed a cover as the tape is sticky. I used the instructions found on Threads Magazine.

Meet Enilorac, my fat stunt double!

Sunday, August 7, 2011

Monique Dress - Muslin #2

Thanks to the advices of a fellow seamstress (Madame Karpen, Merci!) on a facebook group, I resumed working on my Monique dress today! As per her advices, I started with a smaller bodice size, the MEDIUM (38-30-40) and did spread the pattern 2 inches apart, instead of 1.

Pattern Modifications
I made all sort of flat pattern manipulations, based on the book "Every Sewer's Guide to the Perfect Fit" by Morris & McCann:

1) I did an FBA of 1 inch following the method 1 ; I sliced from the pattern Original Bust Apex (apex) to the armhole single notch, from the apex to the waist seam through the waist dart and from the apex to the side seam through the bust dart. Than I spread 1 inch at the apex, tapering to nothing at the armhole.

2) To realign the bottom seam of the bodice, I sliced from the apex to the Center Front (CF) fold and spread 3/8 inch.

Added the maximum suggested (1 in) at the bust with FBA


3) Since I'm more than a D cup, I decided to sliced and spread another inch following the method 2 of the book. For this, I moved the waist dart closer to the side seam so I could slice it in the middle and hit the shoulder seam. Then, I spread 1 inch. This step moved the apex about 2 inches closer to the side seam - I should have move it back to its original position after spreading as I  discovered with the second muslin...

4) I redrew the darts, starting 2 inches away from the new apex and keeping the same dart feet.

Added another inch at the bust with method 2


 5) Finally, I lengthen the front and back bodice patterns by 2 inches, so the waist seam would fall under my bust. I determined this by measuring myself and the flat pattern from shoulder seam to under my bra band both in the back and front.
Lengthen front and back bodice by 2 inches


Sewing Muslin #2
It took me a while to do all those alterations, since I am a beginner at pattern fitting! I was happy to finally try my new acquisition ; tracing paper and a tracing wheel. I decided to trace the SEAM lines as oppose to the seam allowances, as suggested by Gertie's in the Bombshell Dress class on Craftsy (I LOVE this class! I have yet to make the sultry dress...) I did also machine thread traced my seams and cut really big seam allowances strategically at the shoulder and side seams, mostly because I don't know any other method that would allow me to easily measure the modifications I made to my muslin...
Thread tracing of muslin

I was glad that it seems to fit well, except for the darts. The apex was moved when I added the second inch of ease at the bust, but now it was wrong. So the bust dart was too far away from my real bust apex and the waist dart was all wrong!

I elongated the bust dart with pins of about 1 1/2 in. For the waist dart, I had to unpick the basted seams and redo them while wearing the muslin with pins. I will modify the pattern to indicate my real apex and the new darts...
Monique dress, Muslin #2

I wasn't able alone to put more than 2 pins in the back...

The gaping armhole is gone!


What is left to do:
  • Sew my new darts and a zipper (or wait for my husband to pin me in!), to verify ease and if the neckline is gaping (as seen a little on the pictures above)
  • Redraw the waistband pattern to match the bodice and add 1 inch to the length so the waistband bottom will hit my natural waist.
  • Decide if I redraw the facing pieces or use my pattern to fully lined the bodice.
  • Decide if I want any embellishement at the waist and hem...
  • Try the slightly gathered A-Line skirt to determine if I prefer clean darts to gathers... 

What do you say? I might finish it in time for my birthday next week...

Monique Dress - Muslin #1

Bon matin! Talk about an ice breaker post ; I started my Serendipity Studio Monique dress and I am experiencing some trouble to make it fit! So here is my attempt at documenting my alterations and progress, I hope some good seamstress might stumble onto it and give me some advices! 

Pattern Size Choice
At this time, my measurements are : 41-33-40, with high bust of 37. So 4in difference between high bust and bust means am a D cup... (my bra is 34G) Looking at the Serendipity Studio Monique Dress pattern info, I decided on the size LARGE (40-32-42), with 1 in FBA. I knew I would have to fiddle with the waist a little but since its a straight band... 

Full Bust Adjustment (FBA)
It is my first FBA. I'am not sure if I should have tried a X-Large without alteration first. But since the pattern is designed for B cups, I knew it would need tweaking anyway...

Here is what I did to the front bodice pattern piece :
1- I sliced from the Real Bust Apex (RBA) to bottom seam and from RBA to armhole at about a 30o angle. Then, I spread 1 in from bottom to RBA and tapered to nothing at the armhole.

2- To realign the bottom seam of the bodice, I sliced from RBA to the Center Front (CF) fold & spread 1/2 in. Redrew the new dart at 1 1/2 in horizontal distance from RBA, with width of 1 1/8 in each side.
FBA and length alterations

3- To match the side seam between the bodice front and back pieces, I added 1 1/2 in to the back bodice armhole and removed 1 1/2 in to the front bodice armhole (as seen in Fast Fit, by Sandra Betzina). I drew the curve by both eyeballing it and using the original patterns pieces since I do not own a curved ruler yet...
added half the difference to the back and removed it from the front

Now the side seam match

Bodice Muslin #1
I made a muslin of the bodice and it kind of worked out OK. The fabric is medium cotton (I think) at 2$/m from a Fabric remnant shop in Montréal - I bought about 10 meters to make some muslin for a few projects and I plan of wearing my finals muslin afterward, I LOVE the color!

My problems with the first muslin :
  • there is a gap at the armhole;
  • the under bust seams is not quite under;
  • the waistband is about 3in higher than my natural waist.
The waist band is just pinned, white elastic is at natural waist

I just pinned the back too, no zipper yet

Armhole Gap
This is my major problem! I tried to pin it, but the resulting dart intersected the horizontal bust dart - I can't do that, can I!?! What should I do about the gap in the armhole? Is it because I totally ignored the original dart when doing my FBA? Or of poor retracing of the curve of the armhole? Or it's the chosen FBA method that inevitably add more fabric around the armhole? Or I started with a size too big?

Under Bust Seam Too High
To get the under bust seam lower, I plan to slice horizontally between the horizontal bust dart and the vertical under bust dart and to add about 2 in of length.

Waistband height
Because I'm not sure a slightly gathered A-line skirt starting a mere 3 in under my bust would be flattering on me, I am also thinking to lengthen the waistband so the bottom of the waistband hits my natural waist. But I will reassess the waistband height AFTER resolving both previous issues...

Any advices? Merci!