Wednesday, May 8, 2013

Tiramisu Knit Dress - Review

Tiramisu dress, with pockets!

Tiramisu dress, flattering midriff
 
Belted Tira - I swear my lips are not neon!


Belted Tira - real color is deeper...

The Facts 


Pattern: SewingCake 0144 - Tiramisu Knit Dress
Year: c. 2012
Fabric: Used 1.6 yards (size 35D) of Raspberry Ponte di Roma, 60% Poly, 34% Rayon and lycra, medium weight. I machine wash and dry it, can see a little piling but it didn't change the fit.
Notions:
- Ball point needle #70/09,
- Stay tape for shoulders seams,
- Fusible webbing for hemming.
Stitches:
- Basting : #1 Strait stich with length 5.0, Satin foot B
- Construction : #7 Stem stitch, Satin foot B
- Top-sticthing : #6 Strait Stretch stich, Blind Hem foot D at 1/8 in.
- Finishing : #16 Overcast Stretch, Overcasting foot C, cut SA at 1/4 in.
- Hemming : #7 Stem stitch, Blind Hem foot D
Time to complete: maybe 9-10 hours (with tracing, cutting, sewing, learning curve of a new sewing machine and lots of sewing knits 101) Maybe 5h for the next one?
First worn: March 2013.
Wear again? YES! I already did! 

Total Cost: about 25$ for 1.6m of fabric, stay tape, webbing and thread.


The Sewalong Review

Look ma, no gap! (before hemming)
My first sewalong : I loved it! It was from January 8 to 18th 2013. I did not finish in time due to a broken sewing machine foot and some procrastination during the hemming stage...

The format (30 min a day) was perfect for my busy mommy lifestyle of night sewing bursts! Of course, it never took me only 30 min per day ; I'm a perfectionist over planner! But I learned a lot in the process ; it was my first time sewing knits. I am hooked now!

Steph C was very generous of her time and comments. She is good to help, guide beginner sewers and is funny too! The flicker group was awesome ; so much inspiration, help, kind comments! It was like having girlfriends come over everyday to chat and sew the same project! My first sewalong, but definitely not my last! :D


Link to Etsy shop

The Pattern Review

Pattern Description: Tiramisu: a knit dress with a surplice front, underbust gathers and cut-on sleeves, midriff section and half-circle skirt with in-seam pockets. The pattern includes optional stripes placement guide, cup sizing A-D and bust alteration line.
 

Pattern Sizing: Ingenious way to choose you size ; by measurements (no arbitrary numbers here!), cup size and joining the dots for the midriff. I used :
  • Bodice=35D. 
  • Midriff=35 at top to 32.5 at waist. 
  • Skirt=32.5 with 25 hem.

Did it look like the photo/drawing on the pattern envelope once you were done sewing with it? Yes!


Were the instructions easy to follow? The instruction were easy but I loved having the sewalong group for reassurance and variation of techniques by StephC...

What did you particularly like or dislike about the pattern? I love the visual of the pattern instructions ; so clear and simple. I still wish pattern instructions in general would come on Letter sized paper (I have a small desk to sew!), but those were the best I used so far (I had done only patterns from the big 4 before...)

Fabric Used: 1.6 yards of Solid, Raspberry Ponte di Roma, 60% Poly, 34% Rayon and lycra, medium weight.
twirling factor (before hemming)

Pattern alterations or any design changes you made: 


  • I am 5'2" and 40-33-40.
  • I cut the Bodice size 35D, but cut the Front underbust line at size 35A.
  • Midriff : I cut the size 35 at top to 32.5 at waist.
  • Midriff : I also lengthen by 3/4 inch : but will not do it next time.
  • Skirt : I cut the size 32.5 with the size 25 hem. I still removed about 3 inch when hemming.
  • I remove 3/4 inch on the mid riff back (piece #2) at the under bust tapered to nothing at the waist. (mismatched pattern pieces, has been resolved in the second release of the pattern.)


Would you sew it again? YES!! I will do a top with the remnant of fabric (bought 3m to be able to recut pieces if fitting dictates to!) And I would love a 3/4 sleeve version and some for the summer too! I'm super proud of my craftsmanship on this project ; my best to date! I love the numerous quality stitch of my machine...

Related :

Saturday, January 12, 2013

Tira Sewalong - Prepping for Prep


Testing and Playing with Stitches

Tips from Emma One Sock on Double Knit Rayon Blend fabric : 
  • Use jersey or stretch needles size 75.
  • For hem, double needles stretch 4.0/75 or 2.4/75.
  • Threads : cotton covered poly or 100% poly.
  • Gentle touch with iron, medium heat, use press cloth to avoid shine.
 Breakdown :
  • Read all materials/comments related to Day 3 to 7 and note every piece of info I needed! My goal is to stop navigating the web and looking for info while working on my tasks for the day (andget lost in unrelated links!!)... I hope to speedup the process this weekend! (2h)
  • Test fabric under iron settings (15 min)  Cut a press cloth from 100% cotton in statsh...
  • Test stitches, seam finishes, basting and top-stitching (1h) Note : Try overlock stitch/foot, triple zigzag stitch, walking foot, lowering pressure on foot, sewing with paper under the fabric...
  • Try a mockup binding and top-stitching (30 min) 
  • Try a mockup shoulder seam, with stay tape and topstitching (30 min)
 TOTAL : 2h research on web + 2h15 testing/playing with my NEW sewing machine! :D

Basting Construction Finishing Topstitching

Chosen Stitch Settings :
  • Basting : #1 Strait stich with length 5.0, Satin foot B
  • Construction : #7 Stem stitch, Satin foot B
  • Topsticthing : #6 Strait Stretch stich, Blind Hem foot D at 1/8 in.
  • Finishing : #16 Overcast Stretch, Overcasting foot C, cut SA at 1/4 in.
  • Hemming : TBD

Tira Sewalong - Day 2 Cutting


Cutting all done and overview of my project box.


Breakdown of Steps

  • Modify midriff pieces to add 3/4 in in height for my 5 in torso. (20 min)
  • Work on my cutting layout while chatting with my husband ; manage to squeeze everything in about 1.6 m so I didn't need to cut on the floor (and wash it first!)! (30 min)
  • Pins the pattern pieces with the correct stretch lines positions. (20-30 min?)
  • Cut all (40 min)
  • Mark dots on fabric with tailor tacks (threads) or clover chaco liner pen style? (10 min)
TOTAL : 2h10

My cutting layout on 64in (1.6m) of 55in (140cm) wide fabric.

Note : The midriff pieces (far right, with patterns weights) were not pined there, it was merely to reserve some fabric for them to be cut on the remnant fabric folded the other way around, as per the pattern stretch/stripe line dictate.

Personal Comments


I was so afraid to cut my fabric, I think I suffer from the "deer caught in the headlight" syndrome every time I start a new project! I over think everything... But once I start a task, I'm an unstoppable train that ends up a train wreck the next morning because I went to bed at 2am! ;)

PS : I decided not to extend the sleeves of the bodice pieces into 3/4 ones for my first version ; but I still can decide later on to do the long sleeves hack as seen on sewing cake...

Friday, January 11, 2013

Tira Sewalong - Day 1 Tracing

My fabric for the Tiramisu dress.

Breakdown of Tracing Steps

Ponti di Roma
Fabric Choice : Raspberry Ponti di Roma Knit, 60% Polyester, 34% rayon and Lycra. Medium weight. 3m@13$/m about 40$.

Task and estimated time spent :
  • Buy everything needed  (duration not added)
  • Gather tools, pattern, fabric and put in project box (5 min)
  • Machine wash my fabric on cold and tumble dry low. (duration not added)
  • Cut tissue pattern. I did it with the "help" of my 2 and 4 years old. They love scrunching the non used tissue pattern and running to the bin to trow it in! (20 min)
  • Trace errata (10 min)
  • Choose size, reading on sewing cake and flicker again to make sure! (15 min)
  • Ironing tissue pattern (10 min)
  • Prepare kitchen table (10 min)
  • Highlight my size and all the notches with my highlighter. Trace with a teethed tracing wheel on freezing paper, holding both tissue and paper with my weights. Cut the freezer paper with my paper scissors with the notches outward, make 2 recto/verso pieces for #7 and #8, Shorten the hem, write info with ink pen. (1h30)
TOTAL : 2h40

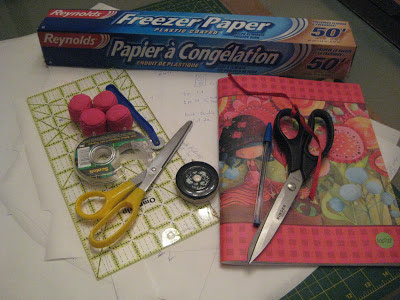
Freezer paper, scissors, tape measure, scotch tape, pattern weights, tracing wheel, ruler, self healing mat, pen and notebook.
Tools used to trace my pattern pieces in my size.

Chosen Sizes

Freezer Paper Pattern Pieces
Freezer Paper Pattern Pieces.
I'm 5'2", muscular built, wide shoulders, full bust, long torso and small legs.
My high bust = 38 in
My Full Bust = 40 in
My underbust = 34 in
My Waist = 33 in
about 5 in between underbust and waist.

The Chosen Sizes :
Back Bodice and binding : size 35
Front bodice : size 35 D
I will extend the sleeves by 13 in.

Midriff : size 35 to 32,5
I will lengthen the midriff height by 3/4 in

Skirt : size 32,5 waist and 25 hem.
Designed hem is 24 po, I prefer 21 in (just above knee on me).

I will sew with a medium weight Ponti di Roma. Not much stretch (2 ways only) but definitely some weight on the bodice.

Personal Comments 

The tracing step is the one I always like less... I did it on the course of 2 days (Jan. 8 and 10). Maybe it would be faster to trace on thin translucent paper?

I need a big enough table to cut and trace in my sewing room with a flat top and maybe counter height. Doing it in the kitchen restrain me to wait until the kids are really asleep since both their bedroom doors are in the kitchen and they are too curious to fall asleep if they see/hear me!


Thursday, December 20, 2012

Demystifying Knits


Bonjour,

I'm absolutely not an expert on knit fabrics and knits sewing, but I'm really good at being totally obcessed and researching a subject until my eyeballs bleeds... I'm thinking about joining the Sewing Cake Tiramisu Knit Dress Sewalong... So here are what I found out about knits fabrics and using them :

Note : I merged this content into my page (see links on the side bar) dedicated to Fibers and Fabrics knowledge...

Wednesday, December 19, 2012

Simplicity 1882 - Muslin part.3

New Sewing Machine and "Progress" on S1882

I started resewing the dress from May to June.  In this post (journal entry!) I state the last steps I made on my dress... I'm a snailstress, really!

After June, camping season came and ended with my oldest child starting pre-kindergarden! I'm so proud of her! So after the frantic months of September and October, I wanted to start working on my dress again, but sadly the sewing machine my mother-in-law gave me stop working...

I now have a new machine (Clara, my Singer Quantum Stylist 9960) and I LOVE IT! I'm doing quite a few tiny projects and Christmas presents in the last month with it - I will obviously post about them after the Holidays!! My new machine offer a lots of stitches and I will need to revisit how I finish the seams of my dress...

Resewing the dress S1882

What I did :

  • Alteration - Hem: I removed 6 inches from the bottom
  • Alteration - Skirt: I removed from nothing (size 18) at the waist to 1/2 inch (size 16) from the notch to the hem.
  • Seam finishing: I chose to turn the seams allowances under, for a cleaner look inside and durability. I tested before on scraps to be sure it wouldn't show through when ironed. I used my blind hem foot to sew equidistant from the folded edge of the seam allowances.
  • I started with the midriff piece and had some trouble to align the piping edge at 5/8" since the store bought piping was only 1/4" ; so I used my grand-mother tape with a long metal end that is exactly 5/8" to align the piping as I machined basted it to the midriff piece.
  • I then sew the skirt pieces and finish the side seams with large double fold bias tape.
  • Attach skirt to midriff : TO DO
  • Alter bodice : TO DO
  • Sew bodice : TO DO
  • Attach bodice to midriff : TO DO
  • Zip : TO DO
  • Collar : TO DO
  • Sleeves : TO DO
  • Hem : TO DO

Next time I should

  • REVIEW HOW STRATEGY TO FINISH SEAMS...
  • Pin carefully the previously finished seams allowance when sewing the piping to avoid them being caught up.
  • Step 10 - Avoid raw edges for the bottom seam of the pockets
  • I need to alter the pattern pieces : TO DO
TIME :  6 h.
Wednesday May 2nd : maybe 1h, I don't remember
May 31rst : 1h alterations
Thursday June 14th :  4h midriff, piping, skirt
Friday June 15th:  ?h, skirt seams finishes not all done...

Sunday, April 15, 2012

Simplicity 1882 - Muslin part.2

Fitting !

I love the pockets!

Alterations :

  • Hem about 6 to 7 inches from the edge.
  • Skirt : tapered from size 18 at waist to a size 16 from top of pocket flaps to the hem.
  • Bodice : Take in 1 1/8 inch at the top of the side seam under the arm  to nothing at the midriff seam.
The dress will have cap sleeves, a black collar and black piping at the waist and under bust seams.

TIME : 1 h
Sunday April  15, 1 h
Update Blog : 0.75 h


Unpicking Basting Stitches

TIME : about 1,5 hour.

Simplicity 1882 - Muslin part.1

Cut Fabric

My NYC glass head pins!

Measures in inches

High Bust : 38,5
Bust : 41
Waist : 34,5
 Hip : 40
160 lbs, 5 ft 2 in.

Making Simplicity 1882, view B, size 18, D cup.
Used a nice plum colored popeline and black popeline accent @2$/m from Fabricville.

What I did:

I decided not to cut the pattern tissues. So I trace with a teethed wheel and wax free carbon paper on my fabric, unpinned the pattern tissues and cut with my rotary cutter every pieces. I used my carbon paper or tracing pen on the fabric to report the notches and dots on wrong side.

Next time, I should:

  •  Trace the pattern tissues onto paper at the right size with the teethed wheel, skipping the carbon paper and the use to remove the tissues before cutting. Then use those paper pattern pieces, directly pinned to the fabric or weighted down with pattern weights, to cut around it with my rotary cutter.
  • Cut the notches OUTSIDE instead of tracing them on the fabric inside the pattern pieces.
  • Continue using pen to trace dots and inside marking.
It took me about 1 week, tracing and cutting a few hours for a few nights, while procrastinating a lot and surfing the web... (maybe 6 hours)
TIME : 6 h

Basting

Basted seams outside, on RIGHT side.

What I did :

Research princess seams sewing technique :

Next time, I should :

  • Step 9 - not sure I should have topstitched on top of the pocket flaps or underneath it??
  • Take better care to notch the flap curves because they were visible on the right side when ironed. So I sew the flap interfacing side up on the dress - but they are sensitive (wrinkles) to heat...
  • Stay-stitch at 1/2 in the curve and maybe slit notches before pinning and sewing the princess seam (or use the magic curve foot!) 
  • I am quite symmetric, so I could avoid sewing the seams outside next time I try to fit garment!?
  • If I mark carefully the alterations, I should skip the basting and fitting steps for the next dresses using this same pattern...

I could buy :

  • pinking shears or rotary cutter blade to finish seams (or use the mounting technique - i.e. partial lining)
  • Get a clean and non leaking iron! 
  • Get the Curve Master 5/8 pressure foot - would be handy for my son's quilt projects (lots of curves planned!) and clothing!
    TIME : 4.5 h
    Saturday April 14, 2.5h, steps 1 to 10.
    Sunday April 15, 2h, steps 10 to 17.
    Update Blog : 0.5 h

      Thursday, April 5, 2012

      Back to sewing!

      Bonjour,

      Since my blog has been declared dead, the Easter long weekend might been just what it needed to resuscitated! (pun intended). I cleaned up my sewing room since its now also my office - the kids have officially taken over the living room and kicked me out! Here are the few projects I recently worked on:

      Super Electric Banana & Super Papillon!

      • I have sewn 2 Super hero cape with the help of this Reversible Super Hero Cape tutorial. They love it! But next time I will make a smaller neck opening... DONE!
      • I've sewn my mega wide leg Gap trouser into strait legs one using the guidance of this tutorial to make skinny jeans. And I've hemmed them and another pair of Gap trousers I purchased. DONE!
      • I've put aside my Monique Dress for now as I was having trouble fitting the bodice and didn't intended to sew its skirt as is anyway: gathers don't help my waist! UFO
      • I manage to sew a belt for my daughter but was unhappy with the thickness of it: it's too hard for her to put in on since it's twisting... So I bought nylon straps to sew underneath my pretty ribbons... IN PROGRESS
      • I started to use my scraps to sew sun hats for the kids with the bucket hat pattern. IN PROGRESS
      • I started Simplicity 1882... I cannot find any review of it yet so mine might be the first, if I could keep on sewing! IN PROGRESS
      So if my documentation of the projects I worked on is of some interest to you, there will be more soon on the Simplicity 1882 Dress!

      Thursday, January 12, 2012

      Blog is dead, long live Blog!

      Bonjour,

      So what happened with this dead blog? I subscribed to a master degree class last semester with too much homework and starting at 16h, too early for my husband to be back home from work... I also worked about 8 hours per week while still being a full time Stay-at-home mom! No sewing done and now my sewing room is buried with Holiday frenzy remnants....

      This session will be similar but the class has no homework and a better schedule. Moreover, I will have one evening free for myself every 2 weeks, thanks Maman et mon chéri! xxx

      So I ordered ribbons from The Ribbon Retreat today to make some belts for my slim bellied kids ; Hoping to summon my sewing mojo and force me to reorganize, again, my sewing room!

      Rainbow : calm after the storm, no?
      Wish me luck!