Showing posts with label Top. Show all posts

Tuesday, January 21, 2020

Jalie #3997 - Rachel Top or Dress

Jalie #3997 : Rachel (options)
Pattern Description:
Dress or top with jewel neckline, draped and tied front. A surprisingly quick and easy-to-make sewing project with unique details.

Pattern Sizing:
Child (size 2 to 13 : 21 to 32 inches bust)
Women (XS to 2XL : 33 to 51 inches bust)
all in the same pattern, PDF with layers.

My measurements :
19 janv. 2020, 175 lbs, 5'3".
(41) 44-36-43 inches.

Size : The first I made was :
  • a size AA (42,75 - 36,5 - 45,75 inches
  • dolman version (sleeveless 
  • without ties
Fabric Used:
Organic Bamboo knit in white from Club Tissus (Brossard), 4 way stretch, more than 40% stretch each direction, a bit on the thin side...

Pattern alterations or any design changes you made:
  • Remove 0,75in at side seams, from hem tappered to nothing at notch. (probably the same as grading between sizes AA waist to BB at hips)
  • Then, removed 3in from bottom
    (Note that the hem ended up waving up because of the twist - HOW TO FIX?)
  • TODO : finish neckline, sleeves and hem.
  • NB : might still need a sway back adjustment?

v1 : Pattern size AA - as is

Try to pin the excess at SS and fold up for length

Try it with jacket : shorten version wins!
v2 : Side seams taken in and hem shortened by 3in
Did it look like the photo/drawing on the pattern envelope once you were done sewing with it?
Yes (except wavy hem)

Were the instructions easy to follow?
Very much.

What did you particularly like or dislike about the pattern?
Very fast sew. I would have liked to see the bust and waist symbol.

Would you sew it again? Would you recommend it to others?
Yes, I want to try a less flimsy fabric and I had ideas about how to make it reversible that I might try eventually... (since the fabric I bought for my next version is too flimsy, if I doubled it maybe it would be better? so might as well make it reversible!)

Conclusion:
to be continued...


TODO : ADD PHOTO v3 FINISHED 
(need to finish neckline, sleeve and hem)

Thursday, July 23, 2015

McCall's 6844 Review

M6844 - Peplum Cardigan


High-low Peplum Cardigan


Pattern Description

McCall's 6844 is a cardigan with fold over neckline with or without a peplum. Close-fitting cardigans (do not meet at center front) have collar extending into front band, and narrow hem. A and C: shaped hemline, wrong side shows. For Sweater Knits, Novelty Knits, Interlock fabrics.

Pattern Sizing

I made view C (high-low peplum) in the size L. I am 5'2", 165 lbs, 40(34G)-33-40. It is a little large in the shoulders, maybe a M with FBA would have been better since the CF meets and the description says it shouldn't.

Did it look like the photo/drawing on the pattern envelope once you were done sewing with it?

Yes, but maybe a tad larger than intended.

Were the instructions easy to follow?

Yes.

What did you particularly like or dislike about the pattern?

I really like the peplum on my silhouette. It is comfortable to wear as being a knit but still chic enough to go out for dinner with it (I paired it with a black pencil skirt and white with fuchsia florals crepe top)

Fabric Used

I used the remnant from my Tiramisu dress (see other review) and I had barely enough to sew it with 3/4 sleeves - the sleeves were also cut with the stretch going up/down for lack of fabric... I love the color and the weight of the fabric for this cardigan, but this poly ponte pile like crazy. I knew that before sewing it so I made it as a wearable muslin.

Pattern alterations or any design changes you made

I mage 3/4 sleeves because I didn't have enough fabric for the long sleeves. I used clear elastic in the shoulders seams.

Would you sew it again? Would you recommend it to others?

Yes, I will try it in M with FBA. In an abstract Black and white print, it would be more versatile in my closet too. I like to wear it with a belt but I think it might be because it is too large and do not look good without the belt (too floppy, no waist definition on me without the belt).

Pattern review page here.

Saturday, July 18, 2015

Comino Cap Pattern Review

Comino Top & Dress Pattern from Kitschy Coo

Blue rayon knit top

I made several tops and dresses with the Comino Cap Top/Dress kitschy Coo Pattern that I bought right when it was released. The blue rayon knit fabric being sheer, I made it shorter to wear with a camisole since I like the camisole to peek below the hem (sorry, in the photo below it rode up!). It is very soft but might not be the most flattering one... My camisole is poly/nylon and when it is too warm I do not like to wear it. But since I sewn it as a wearable muslin to determine the proper size, I am very happy!

Solid Blue Camino Top


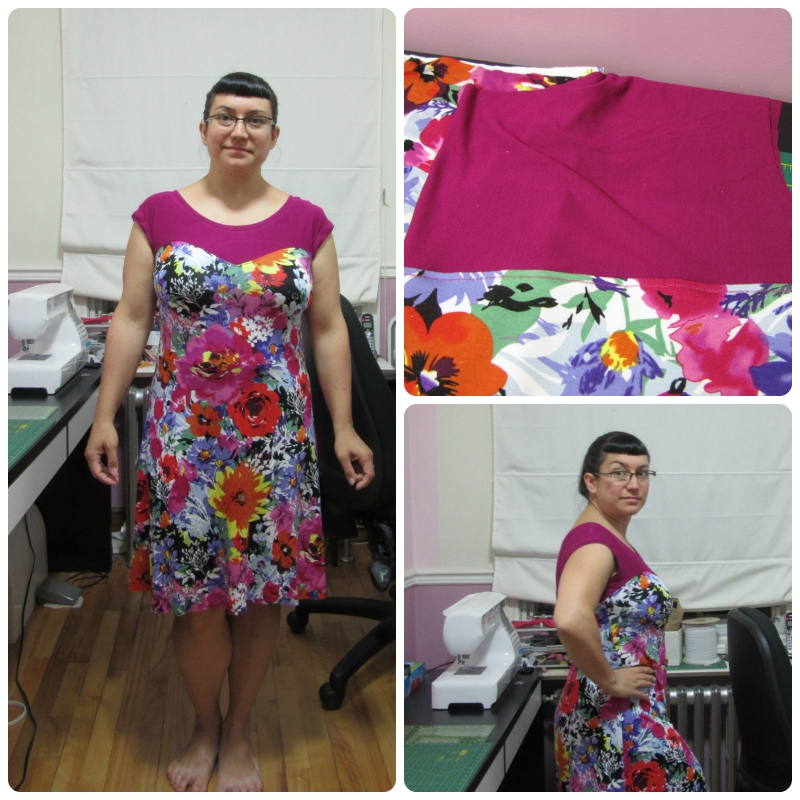
Fuchsia yoke and floral dress 

I love the combination of the rayon fuchsia knit yoke and rayon floral on black knit. Unfortunately, the fuchsia yoke is growing with wear but do not pile. The waist feels too low at the end of the day, but it spring back with washing/drying... I am quite pleased with the flowers alignment at the waist seam too. So I wear it often with my favorite fuchsia flower hair clip!

Fuchsia and Floral Comino Dress


Black yoke and abstract blue top & dress

I adore the black organic cotton knit I used for the yoke. I bought it during the Open house at the Oöm atelier last spring for about 2$ for a handful of remnant pieces. It is very soft and has a great bouncy recovery. The abstract blue/black/green looks like a Ikat print and was bought last July 4th during the sewing bloggers meet-up on St-Hubert. I fell in love with the colors and it was a bargain at 6$/m since I was able to cut the Comino top and dress in less than 2m! And I have enough left for either underwear or a kid's shirt even if I was careful about pattern placement to get a continuity of the print at the side and waist seams... My 6 year old daughter already made a tiny dress for her mini doll with some floor scrap... I am so proud of her! :D

TODO : Add a photo when it is hemmed...

Comino Cap Pattern Review

Pattern Description

Comino Cap Top/Dress kitschy Coo Pattern can be made in a cap sleeve top or dress and with or without a sweetheart neckline yoke. It remind me of the Colette Macaron but for knit fabrics.

Pattern Sizing

I used size 5 and I am 40 (34G) - 33 - 40, 5'2" and fluctuate around 163 lbs this summer.

Did it look like the photo/drawing on the pattern envelope once you were done sewing with it?


Yes.

Were the instructions easy to follow? 

My main modification is to stabilized the V neck and shoulder seams. I also didn't finished the seams that were topstitched. So here's my preferred method :
  1. Stay stitch the lower bodice piece V neck on 1in each way, using staytape. (cut the itchy staytape to ensure it never touch my skin!)
  2. Sew upper to lower bodice pieces for BACK and FRONT, press SA down and topstitch.
  3. Sew shoulder seam using clear elastic (or staytape) as stabilizer. Press SA to back and topstitch.
  4. Prepare the 3 binding bands : sew ends together in a tube, press SA open and press tube folded in half, pressing a fold at each 1/4.
  5. Pin neck binding at each 1/4, sew, press SA down and topstitch.
  6. Sew side seams, finish and press to back.
  7. Pin armholes binding at each 1/4, sew, press SA down and topstitch.
  8. (Optional) Sew and finish skirt side seams. Then, attach skirt to bodice, finish SA and press up.
  9. Hem 1inch with double needle.
Stabilizing shoulders and V neckline.


I found it way easier to sew that the sweetheart neckline yoke let me believed. The point is not hard to sew and I didn't get any stretching, maybe because I used staytape there too?

Fabric Used

Different knit fabrics, mostly rayon/lycra blend and lightweight. A fabric with good recovery is needed for the yoke, even more important if you plan a sheer yoke, else your bra top will show is the fabric stretch with wear... I plan on sewing one with a sheer yoke eventually!

Pattern alterations or any design changes you made

Not much, they are all size 5. The solid blue one has it's hem shorten by 1,5 in. The dresses has been shorten at the shorten here line to 20in from waist to hem and the side seam are a little altered to fit my fabric.


Would you sew it again? Would you recommend it to others?

Yes! I love these tops and dresses. I think it is a very comfortable casual summer dress, but looks special with the yoke! It also allow to use smaller fabric remnants. I keep thinking to make a waistband to make it a little less casual or to wear it with a real belt.


Here is my official pattern review on Patternreview.com.

Monday, November 3, 2014

I gave in and ordered from eShakti

eShakti top with 3/4 sleeves in 41-34-41 custom size.

So, since my semester started I have barely time to breath, let alone sew!! But I did the next best thing, design a top for my custom measurements and had it sewn and shipped to me ;)

eShakti is a web only shop for very nice dresses, tops and skirts ; with some retro flare and a lot in natural fibers. What is special about them is that you can order an item to your specific measurements and customize the sleeves, neckline and hem length... All for a very reasonable price I think.

I tried a knit top first, just to test their customize size options in a top I wouldn't necessarily need to pay to return... When you register you get a welcome rebate and I bought my top at 30% during a promotion weekend... So it was 38$ before tax but I paid 28$ with taxes and shipping for a custom made top. It arrived VERY fast 5 days later! Here is the review I sent them after washing and wearing my top 1 day :

The original top


"I love the color, the material is a medium-thick interlock knit, the quality of the sewing is perfect. I order to my measurements, I am 5'3", (34G) 41-34-41, 165 Lbs.

The bust fits me very well, the waist/hip hem is just too wide for my taste. There is more ease than I would have sewn in a knit (too boxy for my shape ; I need the top to come in below my bust to be more flattering).

I am considering adding thin darts vertically under the bust and taking the side seams in a little.  Meanwhile I will wear it tucked in only.

I would have loved a thin black elasticized sleeve hem or cute cuffs for elbow or 3/4 sleeves...

I love the options for sleeves and length. I wonder why all dresses in poplin are not offered in all colors? Maybe you could ask the customer's preferred fit for knit garments ; this knit top has too much ease for a knit but a similar woven might be fine... The packaging smelled bad (plastic smell) but I washed the top so it all went away..."


I didn't received anything from eShatki, I am just posting my review here in case crazy ladies like me stalk the web to see what they want to buy on someone else before committing to a purchase! ;)

I am not convinced yet that their sizing is good (nor bad), maybe the style was just not the most flattering on me... The real test would be to order a sheath dress without stretch!! I am quite smitten by this one even if it is polyester...

quilted jacquard dress
Diamond quilt jacquard sheath dress


Thursday, September 12, 2013

Indigo Verso Draped Cowl Top


RTW and MINE Front Draped Top - Worn backward!


Copy of my Favorite RTW Top

I had this top for years... I even think I kinda stoled borrowed it from my mom. And I always wears it backward, with the deep draped cowl in the back. It was not expensive and is made out of black viscose (from Dynamite maybe?). Still, I find it comfortable and elegant. So I decided to try to copy it and even add 3/4 sleeves - they looks more like 7/8 but, Hey, it's cold up here!

I didn't quite follow the instructions from Cake Patterns (the sleeve hack here). I just drew a trapeze with my bigger arm circumference and the circumference where I wanted to sleeve to stop. Then I felt guilty, went back to Steph's notes and drew a curve on the sleeve top! I added a simple band at the sleeve hem to wear it a little bit more crunched up. I wore it for the first time with a pencil skirt I rediscovered in my closet to the Montreal Bloggers Meetup at the museum...

I am really proud of the result! What I could make better next time : I should remove about 1,5 to 2 inches at the shoulders, they are dropping a bit. Also, there is excess fabric below the armpit and the armband is a little too snug. Finally, the shoulders are always falling off, probably because I gave myself a little room in the armholes (they were tight in the RTW, but migth be what hold it up better?) I will sew lingerie straps in the shoulders to fix that.

 
RTW and MINE - Curvy Side View

RTW and MINE - Plain "Front"


Copying RTW Resources

This ideas germinated from the Jean-ius class, by Kenneth The King, on Craftsy... I didn't went through a lot of trouble to trace my RTW top on paper ; no thread tracing or anything... I just folded it strategically, traced with my teethed tracing wheel on freezer paper and added 3/8 inch seam allowances. I did however stabilized the front neckline by sewing stay-tape to the neckline, finishing it with my overcast stitch, turning and top-stitching. The back neckline has a facing (fold over) of 3 inches and is just finished with my overcast stitch (sewn on top of silk paper for prettier stitches).

After all this, I went to my local library and borrow "Patterns from finished clothes" form Tracy Dole. It has tremendous information about how to copy RTW, from collar to yoke, darts, pleats, waistband, cuffs, lining and knits garments! I was really impressed by the step by step pictures and good tips! I now feel better about the half dozen tired garment I horded because I thought that I might copy them one day! :D


Tuesday, July 30, 2013

Peplum Camisole

Rewarding fast projects - I traced around my favorite camisole (tank top or vest) and added 3/8 inch seam allowances. I love this better because it doesn't require to cut closer to the edge to finish the seams with my overcast stitch and it is exactly the width of my favorite sewing machine foot.

I tried it on, adjust a little the armhole, did a sway back adjustment and took note of the waist to create the peplum version... I just used my waist circumference and the formula : 2 x PI x RADIUS = CIRCUMF.  I decided to do a half circle skirt, so I made my formula with : CIRCUMF = 2 x WAIST. Or if you prefer : RADIUS = WAIST divided by 3.14. And I drew only 45 degree of it, to be cut on fold, twice. A picture is worth a thousand words they say :

Peplum Pattern Piece, cut 2 on fold.


1) I made it first exactly as my favorite camisole, with remnant of a 2$/m knit velvet I bought for an Halloween costume years ago. I forgot all about nap and ended up with it being visibly different for the front and back, Oups! I needed a sway back adjustment : an horizontal dart of 5/8 inch to remove the back wrinkles.


1) Muslin

2) Then I tried my peplum version with the same velvet fabric and liked it enough to sew arm and neck bands on it and wear it. The 10 inch peplum skirt is a little long, but I could hem it shorter eventually...

2) Velvet Peplum

2) Velvet Peplum


3) Finally, I tried to use my leopard kimono tee remnant to see if it would work in a cotton 1-way stretch knit and made the skirt only 8 inch long. The arm and neck band are made of the same velvet strips I already cut for the previous version...
 
3) Leopard Peplum
3) Leopard Peplum

Sunday, May 26, 2013

Yoke Kristen Kimono Tee


My 3rd time with the Kristen Kimono Tee pattern : I used the burnout fabric for the yoke, a colorful leopard print 100% cotton for the body and some fold over elastics.

I was lazy when I modified the pattern, not translating any difference from the original pattern for the Front and Back. I base it all on the back piece because I wanted the neck to be high, so not to interfere with the yoke... Hence, I used only 2 pattern pieces : one for the yoke and one for the body. It worked out OK I think, a little snugger, but it might just be my fabric too?

I tired fold over elastic (FOE) with a picot edge for the neck and sleeves hems because I was not happy with the unfinished edge of my last burnout version... I just turned once and stitch for the bottom hem, fusing Heat N Bond Lite 10mm between the folds.

Tuesday, May 14, 2013

Burnout Kristen Kimono Tee

Kristen Kimono Tee v2 on camisole solo

Tips and tricks

The second time I made this top, I used a very light weight Poly/Rayon burnout knit. I tried all short of stitches, tensions, width, length... But what worked best was to use tissues paper between my fabric and the feed dogs ; So much easier! Else, my fabric got sunk below the sewing machine plate and removing it either distorted or punctured it. It was also harder to cut, but I manage with my pattern weights and rotary cutter again!

Light weight burnout Poly/Rayon Knit
Using tissue paper between the feed dogs and the fabric
with stay tape at the shoulder seams
Sew with the stem stitch


Ripping the tissue paper is easy afterward.
Then finish the edge like you prefer
Resulting seam!

Wednesday, May 8, 2013

Kristen Kimono Tee - Review

Free pattern - Kristen Kimono Tee

The Facts

The simple kimono sleeves
Pattern: Maria Denmark - Kristen Kimono Tee (FREE!)
Year: c. 2012
Fabric: used about 0.75m of lightweight Poly45/Rayon50/Spandex5 blend @ 10$/m : it has white thin stripes all over "on top" of a multicolored splashes pattern.
Notions:
- Ball point needle #70/09,
- Stay tape for shoulders seams,
- Fusible webbing for hemming.
Stitches:
- Seams & top-stitching: Stem Stitch #7, Satin Foot B
- Finishing: Overcast #15, Overcast Foot G
Time to complete: 4h, from printing to wearing!
First worn: Right when I finished it, May 2013.
Wear again? YES! I already did! 

Total Cost: about 8$CAD.

The Pattern Review

Pattern Description: Free simple kimono sleeves tee-shirt pattern, print at home.
 

Pattern Sizing: Few sizes XS, S, M L , XL. I am 5'2" 40-33-40 and cut a L.
 

Straight face? I can't play poker!
Did it look like the photo/drawing on the pattern envelope once you were done sewing with it? Yes!

Were the instructions easy to follow?   Yes. I used fusible webbing on the hems and stay tape on the shoulder seams (like the Blank Canvas Tee recommended).

What did you particularly like or dislike about the pattern? I had both patterns (Kristen Kimono Tee and Blank Canvas Tee) printed and choose the Kimono Tee because it has fewer pages... It was easy and fast to sew. I think the stay tape in the shoulder could be added to the instructions, but I'm new to sewing knits, so maybe it would have been OK without!?

Fabric Used:
used about 0.75m of lightweight Poly55/Rayon40/Spandex5 blend. I choose it for the royal blue since it fits my kinda skinny jeans.

I chose the fabric to go with my jeans...
Pattern alterations or any design changes you made:   I just turned and stitch with the stretch zigzag (light-bolt icon) on hem, sleeves and neckline. I would do the neckline with the ribbing or FOE next time to avoid the neckline to wave a little. I still wear mine proudly! :D

Would you sew it again? YES!! This was a test garment : I'm now hooked on sewing fast Cake projects! I'm thinking a burnout one like Scruffy Badger, one with a yoke and one with a keyhole neckline...

Related links :